Lesson 8 – The Theremin

This week you will be building a Theremin, which is a musical instrument controlled by positioning of the hands in the air over the instrument. I will provide the circuit below and some hints. It is up to you to see if you can make it work.
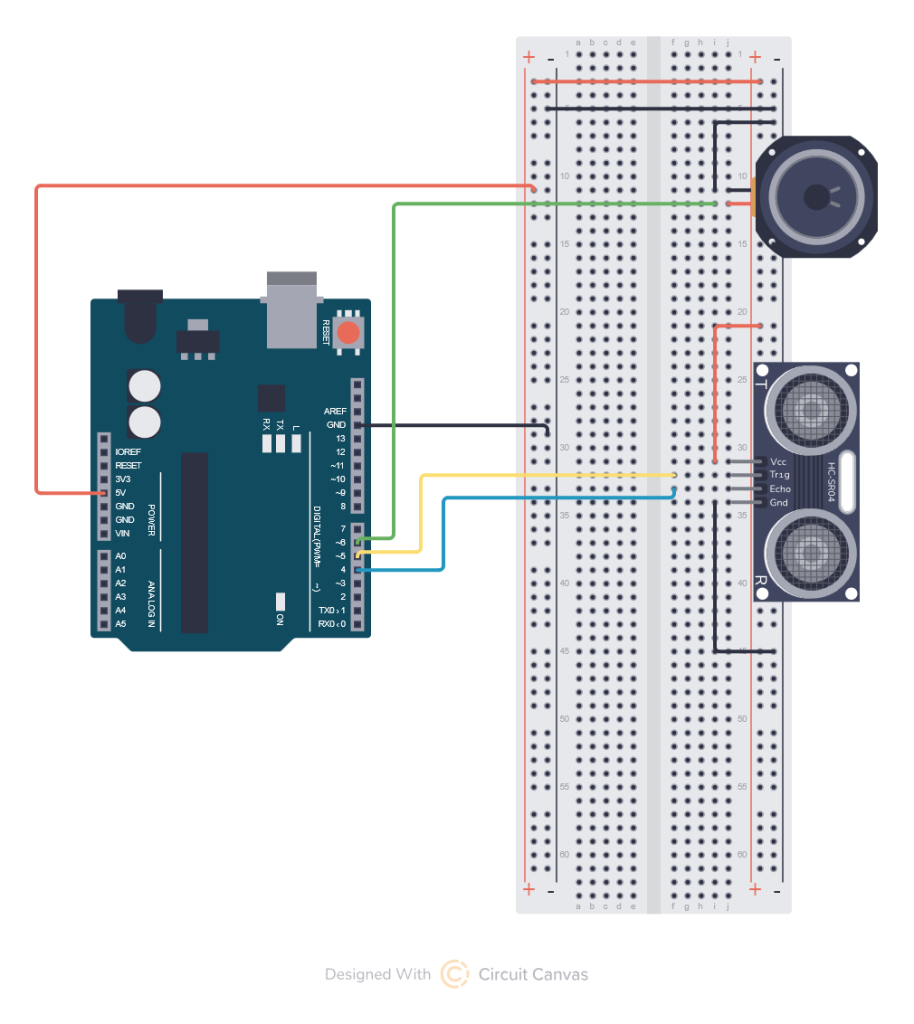
Note: Be careful to realize that the picture above will connect the sonar pointing to the left, if you connect it pointing to the right you need to flip all the wires are well. You risk damaging you sonar if you connect it backwards. Carefully check the pin labels Vcc should go to +5v GND should go to GND and the Trig and Echo pins need to go to pin 5 and 4 respectively.
Your hints: You learned in previous lessons how to read a distance from the sonar sensor you will need to do this again. For this you will set up two pins one for the trigger and one for the echo I chose in the circuit above 4 for echo and 5 for trigger
So you will need the following items in your code:
Outside all the functions you will declare the pin definitions for the SPEAKER, the ECHO and TRIGGER as well as vaue to store the measurements from the sensor and the output pitch.
const int PITCH_SENSOR_ECHO = 4;
const int PITCH_SENSOR_TRIG = 5;

long pitch_time;
short pitch_distance;
int pitch;

const int SPEAKER = 6;

const int LAG = 60;  //Time delay between starting the loop that changes the pitch
Inside the setup loop you will need to define the pin types (INPUT and OUTPUT)
I also suggest setting up the serial output so you can read the values in case you need to “tune” your Theremin.
void setup()
{
  Serial.begin(9600);

  pinMode(PITCH_SENSOR_TRIG, OUTPUT);
  pinMode(PITCH_SENSOR_ECHO, INPUT);

  pinMode(SPEAKER, OUTPUT);
  Serial.println("Starting Theremin");
}
You will define a function for reading the pulse duration from the sonar.
long senseDistance(int triggerSensor, int echoSensor) {

  digitalWrite(triggerSensor, HIGH);
  delayMicroseconds(10);
  digitalWrite(triggerSensor, LOW);

  return pulseIn(echoSensor, HIGH);
}
In your main loop you will read the distance and use it to calculate a frequency. I’m not giving you the full code for the main loop, you need to play with it and figure it out.
You will be using a new built in Arduino function called map which takes a floating point value, an input range of numbers and an output range of numbers. It scales the input range to fit the range of the output for example:
map (input, #1#, #2#, #3#, #4#) where #1# is the low input range, #2# is the high input range, #3# is the low output range and #4# is the high output range.
map(pitch_distance, 0, 10, 0, 100) would take the values between 0 and 10 and stretch them to match a range of 0 to 100 so 0 would become 0, 1 would become 10, 2 would become 20, etc.
I am leaving the values blank but for reference music notes are generally in a range of 440Hz to 2186 Hz. You distance measurement will be based on how you plan to play the Theremin so you need to use the Serial console to find your input range.
You will also be using a new command tone(pin, pitch, duration) you see we got the pitch from the map function, and the PIN is set from the SPEAKER variable. you can play with your own values for the duration #5#. There is also a defined LAG which is the time from the start of one loop to the start of the next. You probably want LAG equal to or greater then the tone duration, but you can play around and see what you find sounds best.
void loop()
{

//Calls a function to sense the distance (in time) to an object and stores it
pitch_time = senseDistance(PITCH_SENSOR_TRIG, PITCH_SENSOR_ECHO);
Serial.println(pitch_time);
//Uses the time to calculate the distance in cm
pitch_distance = pitch_time/58;

//Map the distance to the frequencies that you want to output
pitch = map(pitch_distance, #1#, #2#, #3#, #4#);
Serial.print("Sending pitch ");
Serial.println(pitch);
tone(SPEAKER, pitch, #5#);

delay(LAG);
}
The items in BOLD in the code and the things you will want to adjust to get your Theremin sounding how you like it. Bring it back next week and we will have a Theremin concert.
You can improve upon the sound by using a list of real music note frequencies and if you can figure out how, you can prevent it from playing tones that are not in the list. For your use I have added an array of valid music notes on the standard Piano keyboard below.
const double noteFrequencies[] = {
    32.703, 34.648, 36.708, 38.891, 41.203, 43.654, 46.249, 48.999, 51.913, 55.000, 58.270, 61.735,
    65.406, 69.296, 73.416, 77.782, 82.407, 87.307, 92.499, 97.999, 103.826, 110.000, 116.541, 123.471,
    130.813, 138.591, 146.832, 155.563, 164.814, 174.614, 184.997, 195.998, 207.652, 220.000, 233.082, 246.942,
    261.626, 277.183, 293.665, 311.127, 329.628, 349.228, 369.994, 391.995, 415.305, 440.000, 466.164, 493.883,
    523.251, 554.365, 587.330, 622.254, 659.255, 698.456, 739.989, 783.991, 830.609, 880.000, 932.328, 987.767,
    1046.502, 1108.731, 1174.659, 1244.508, 1318.510, 1396.913, 1479.978, 1567.982, 1661.219, 1760.000, 1864.655, 1975.533,
    2093.005, 2217.461, 2349.318, 2489.016, 2637.020, 2793.826, 2959.955, 3135.963, 3322.438, 3520.000, 3729.310, 3951.066,
    4186.009
};
It is up to you to figure out how to use it to restrict the frequencies. A hint is that you want to adjust the pitch to the nearest value in the list. There are many ways to do this. I’ll give you the answer next week.